2024 Self Portrait Project - January
Dinner for One, self portrait, January 2024
Winter is typically a time for rest, but for me it’s when I’m coming up with creative projects to take into the new year. In January, I was still buzzing with excitement and inspiration from my Valentine self portraits that I took the month before. 2023 I had been in front of my own camera more than ever before, probably since first learning photography in high school. I had more ideas, so I decided to make it a year-long project. Each month I would sit down, decide on a theme or concept or point of inspiration, sketch my stick figures, design a set, find the wardrobe, plan a date, and head to the studio and bring it to life. I’m starting to see myself as my own muse.
The Pre-Planning
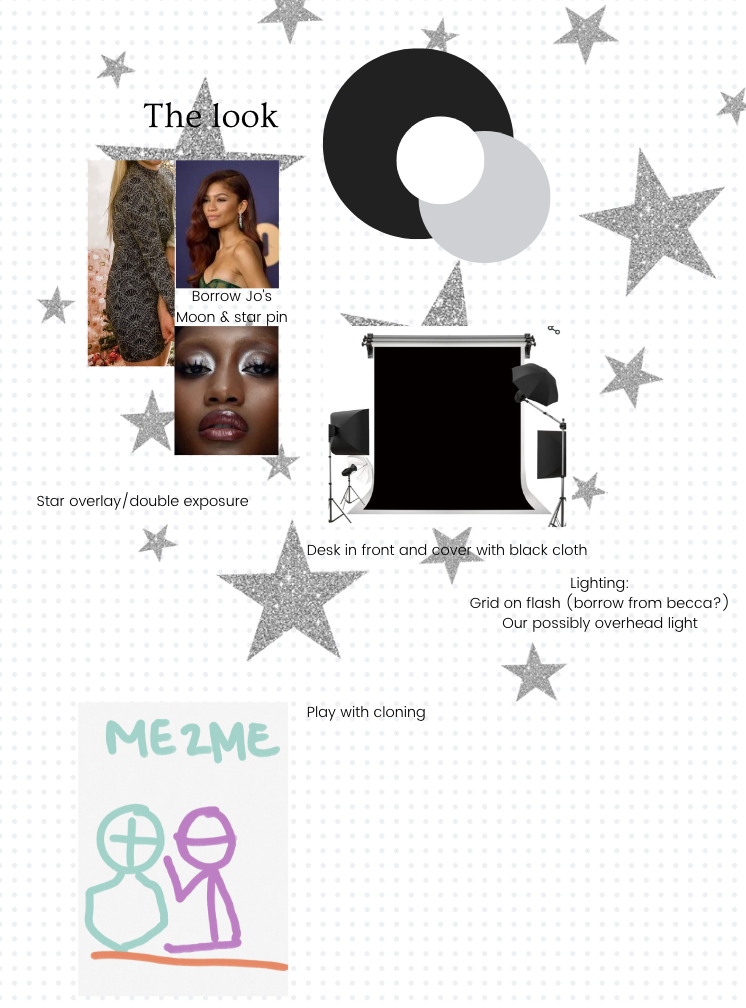
I had written down a few ideas that came to mind for my January portrait, and began cycling through which one I felt the most connected to; which one I could see a final image of. I was primarily inspired by a sparkly dress I have that I’d only worn a couple of times for New Year’s parties or the ballet. I started thinking maybe stars on string, do something kind of typical “New Year” with silver and glitter. I had recently looked through some of my work from high school, recalling the different prompts we were given each week to experiment with in camera or post-processing techniques. I’ve had the thought for some time, to revisit some of those prompts and techniques, and use them in my current work. This is where I got the idea to do a “clone” of myself in the photograph with me.
Cloning is a technique that can be done in camera, or in Photoshop. I wanted to take my time, and have total control of each individual photo before and after they were merged into one, so I took each photo separately, and then brought them together in Photoshop. I’m pretty happy with the result, looks pretty seamless if you ask me ;)
The moodboard for January 2024 self portrait
I planned out my hair and makeup, too. I wanted to tie in the stars with my earrings, and since my wardrobe was so loud, I went lower-key with my makeup doing a shimmery eye and a muted red lip. Some things I hadn’t thought that far in advance about, like the style of my hair. I had it pulled up just on the left side, for a simple style with curls. Once I was making my images, I realized I could use that to my advantage in separating these two characters of myself. One who was more open, vulnerable even with hair back; the other who was hidden, secretive behind a wall of long hair.
Now that I’d made a plan, it was time to head to the studio!
The Photoshoot Process
Based on my moodboard, I knew I wanted my photograph to lean dark and dramatic, almost like an old painting. I set up a black backdrop, and put a black sheet over my desk to use as a table. I ended up forgetting/not really caring about the whole thing with the stars, so I just let it go and turned it more into a dinner-with-myself sort of idea — more on this later. So I set it all up, here’s a little video of what that looked like!
The Meaning Behind the Photo
I knew I was going to clone myself in the photo, so I turned away from the more surface-level idea of the New Year vibe, and went more with the idea of talking to myself, me getting in my own head, even exploring my feelings of anxiety. Anxiety is sometimes very loud, and other times it feels like a tiny whisper, planting ideas and imagining scenarios just to get a reaction out of me. My personality makes me lean into anxious thoughts, my curiosity getting the better of me. You can see the left side clone has a more open posture, ear exposed, and is even leaning in to listen despite the hesitant look.
The right clone is representing those inner thoughts. She’s mysterious, closed off, hiding her face with hair and a hand, appearing to be whispering so as to not be heard by others. I’ve struggled for a long time to even acknowledge anxious thoughts for what they are, I just always thought I was worrysome/crazy/delusional. We’re dressed up, hair and makeup done, which kind of makes me think of the way I can put a mask on to just be okay for everyone else while that right-side clone talks my ear off. I mean look at her glass, tipped over spilling ridiculous scenarios about anything and everything.
While it’s my goal to be able to consciously think about these details beforehand, not all of those things were at the front of my mind in the planning process. Like I said before, a lot of the idea changed once I got to the studio. I do think the choices I make are for a reason though, whether they are conscious or subconscious.
The Editing Process
I described what cloning is earlier, but what does that really look like? I’ll break it down a bit more for those who are curious. Just remember that there are 21 different ways to do the same thing in Photoshop, this is just how I’ve done it!
The first step is in camera. To get the cleanest background result, you want your camera on a tripod the entire time. Don’t move it once you’ve decided on a placement, so that the only thing changing in your photos is your subject placement. Take several photos of your subject in different places, doing different things, if you want a challenge even interacting together. Doing this as a self portrait is even more challenging, but totally achievable with a remote trigger (I use an app on my phone for Canon!) for your camera and some patience. It’s also easiest if your background has consistent lighting which is easy enough indoors, but if you’re working outdoors you’ll want to work fast!
Once you’re ready to bring your photos together. You’ll need at least 2 different photos to make the cloning effect. This next part will take practice, basic knowledge of photoshop, and even more patience than the photoshoot. Bring one photo in as a layer on top of another. Then my preferred method is to make a mask over the top photo layer, and just paint in the clone and whatever background parts are necessary/make sense. I like to do it this way because then I can loosely reveal the overall area of the subject, then mask out the extra bits in more detail. For example, in my photograph, the background is just flat black, so the only part that really needed painted in was myself. There was some overlapping of the inside shoulders and arms, but since the background was black anyway, it was easy to leave some of the background feathered between us to look like the clone on top was leaving a shadow on the one behind. It takes a lot of messing around, and may even include adding in shadows artificially to make it look more realistic. Overall, it’s a ton of trial and error, so keep at it!
I love how much this project is already making me think about art, my creative process, and storytelling through images. I’m excited for February’s project (happening tomorrow!) so keep an eye out for more blog posts each month about future self portraits! Thanks for being here xo
And of course, if you’re wanting to book your own photoshoot with me, you can click the button below so we can start planning your dream session!


